

WebMCP in Chrome (A 101 Guide)
MCP (Model Context Protocol). At this point, you might have come across this term if you’ve worked with any kind of AI agent. But if you still haven’t, here’s a quick refresher on what it is and why it’s important.
In simple terms:
MCP is like a USB-C port for AI. Instead of building a custom connection for every app or database, MCP gives AI a standard way to connect to external tools.
For example, imagine an AI assistant that needs to:
- Read files from Google Drive
- Check your calendar
- Query a company database
- Use GitHub
- Search a knowledge base
With MCP:
- The AI knows how to talk using the MCP standard.
- The tool (Google Drive, GitHub, a database, etc.) provides an MCP server.
- They can communicate without needing a unique integration every time.
So, essentially, Model Context Protocol (MCP) is an open protocol that standardizes how AI models and applications communicate with external tools, data sources, and services by defining a common client-server interface.
Now, let’s talk about WebMCP.
- What is WebMCP?
- How to Use WebMCP in Chrome
- Registering Tools via
navigator.modelContext - Registering Multiple Tools or Batching (
provideContext) - Unregistering Tools
- In closing
- Further Reading
What is WebMCP?
Think of this analogy where a real person is interacting with a website. The person can see the page, click buttons, fill out forms, and navigate through the site. Now, imagine an AI agent doing the same thing. Normally, an AI agent behaves like a person using a browser. It has to inspect the DOM, find buttons, understand layouts, and hope the UI hasn’t changed.
In a nutshell, the AI agents (such as an in-browser agent, Claude Desktop, or Cursor) attempt to do vision-based browsing where they take screenshots of the page and try to click elements visually.
This approach is slow, expensive (vision tokens cost more), and error-prone when handling complex UIs (e.g., hover menus or sliders). And this is where WebMCP comes in.
With WebMCP, the website explicitly tells the AI agent, “Here are the things you can do and the data you can access.” And so, it doesn’t have to guess or scrape the page to do its thing.
So, a concise definition of WebMCP goes like this.
WebMCP is a browser-based implementation of the Model Context Protocol (MCP) that enables web applications to expose standardized tools, resources, and prompts directly to AI agents running in or through the browser, allowing structured interaction without relying on DOM automation or screen scraping.
WebMCP brings the idea of MCP directly into the browser, allowing web applications to expose MCP capabilities to AI assistants.
In other words:
Web page → WebMCP → AI Agent
instead of
Web page → DOM scraping → AI Agent
So, WebMCP is a bridge between web applications and AI agents, allowing them to communicate in a structured way that is more performant and reliable.
How to Use WebMCP in Chrome
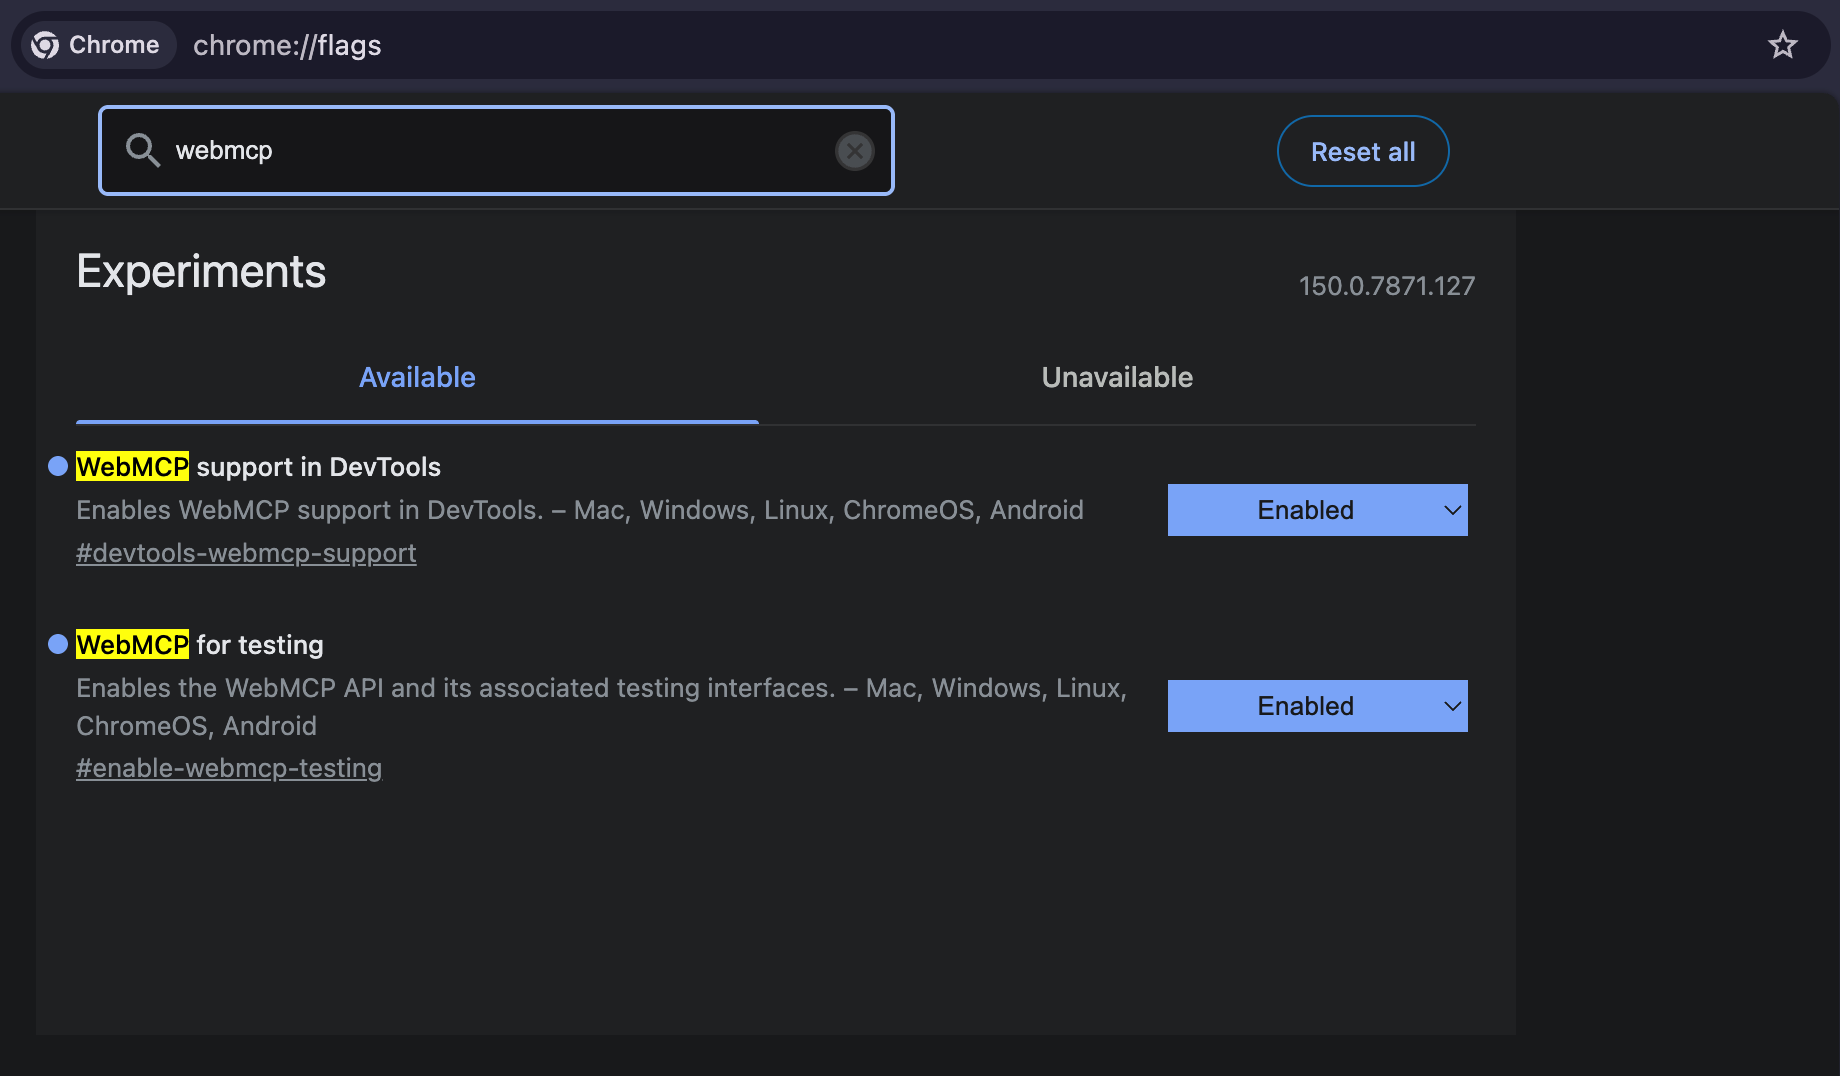
WebMCP is supported starting in Chrome 149 as an origin trial. You can enable support for WebMCP in Chrome by turning on the WebMCP support in DevTools and WebMCP for testing flags in chrome://flags.
Once done, you can see a new WebMCP tab in the Chrome DevTools panel like so.
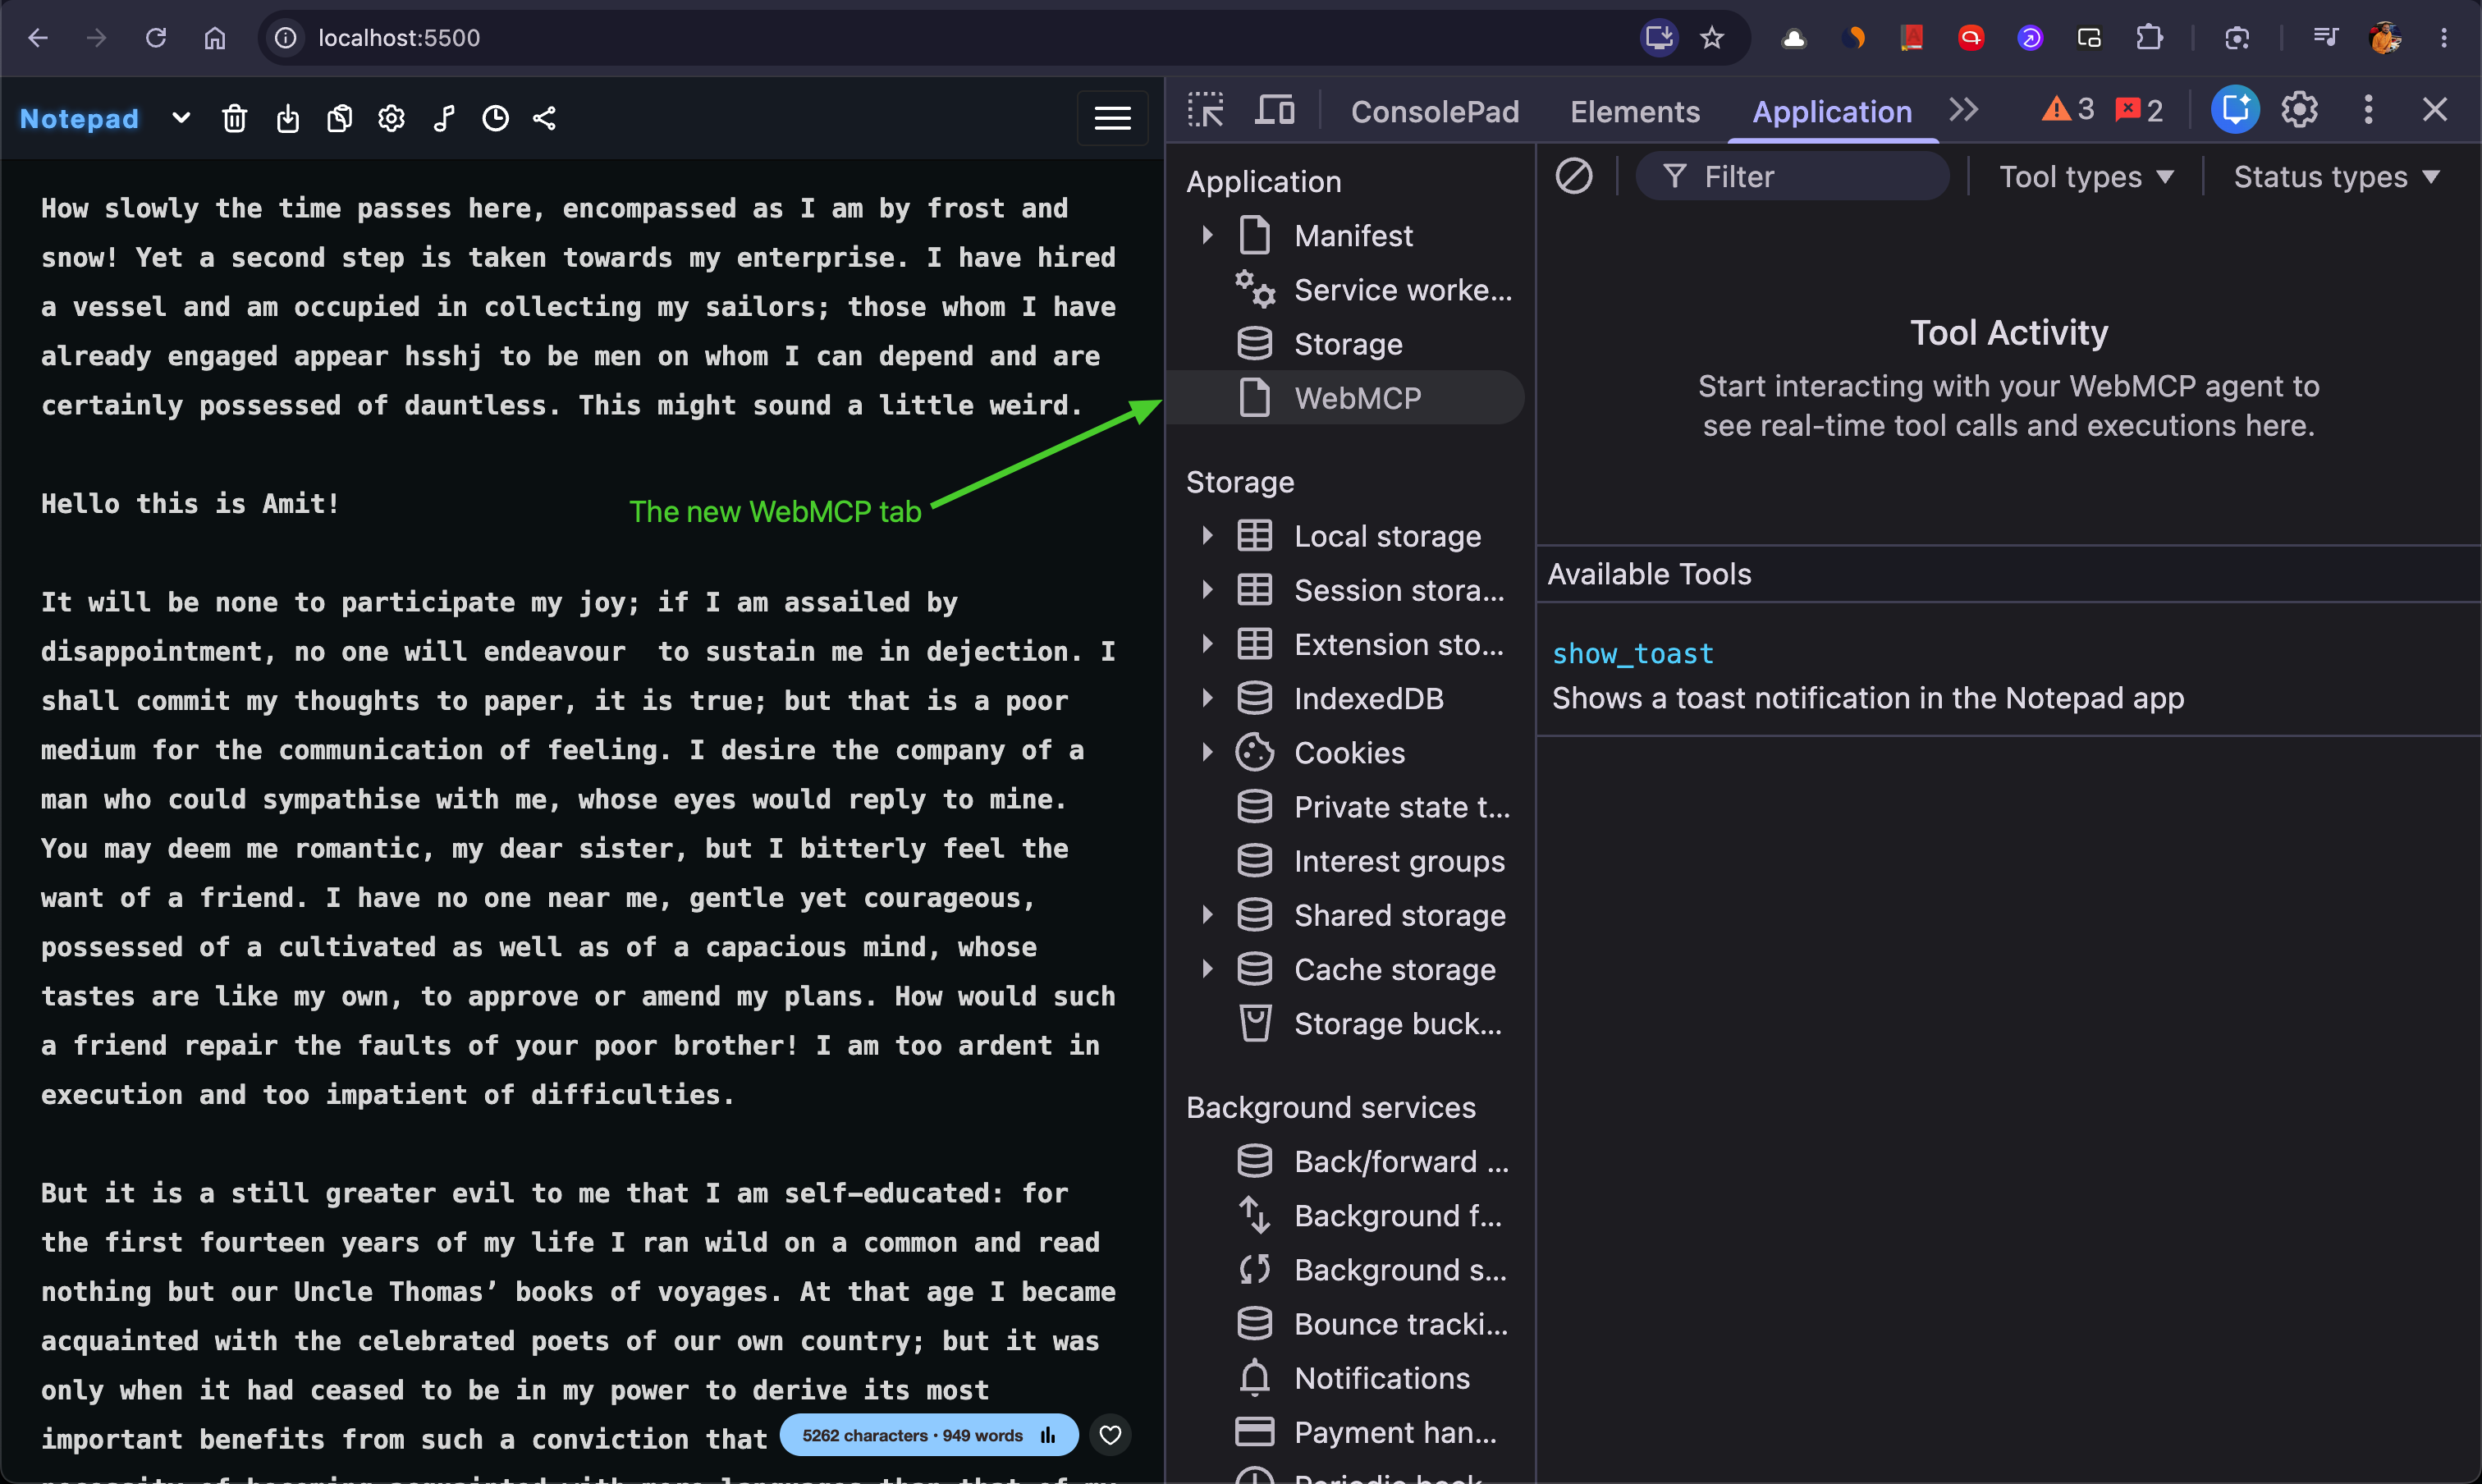
This tab allows you to inspect and interact with the MCP tools that a web page exposes to AI agents. You can see the registered tools, their input schemas, and even test invoking them directly from the DevTools interface.
Registering Tools via navigator.modelContext
Now, let’s see how a web page can register tools for AI agents to discover and use. This is done using the navigator.modelContext API.
So, for instance, if you want to register a tool that allows an AI agent to add a new to-do item on your web app, you can do it like so.
// Check if WebMCP API is supported in the browser
if ("modelContext" in navigator) {

  // Register an individual MCP tool
  navigator.modelContext.registerTool({
    name: "add_todo",
    description: "Adds a new to-do item to the user's task list.",
    inputSchema: {
      type: "object",
      properties: {
        title: {
          type: "string",
          description: "The description or text of the to-do item."
        }
      },
      required: ["title"]
    },
    // Handler function executed when the AI agent calls this tool
    execute: async ({ title }) => {
      const response = await fetch("/api/todos", {
        method: "POST",
        headers: { "Content-Type": "application/json" },
        body: JSON.stringify({ title })
      });
      const data = await response.json();
      return { success: true, result: data };
    }
  });

}
As you can see, the above code registers a tool named add_todo that takes a title as input and adds a new to-do item to the user’s task list. The execute function defines how the tool behaves when invoked by an AI agent.
You can specify the input schema for the tool using JSON Schema, which allows AI agents to understand what kind of input is expected. In this case, the tool expects an object with a title property of type string and that it’s a required field.
Instead of writing a whole execute function, you can also return a preexisting function or a simple action like showing a toast notification.
execute: ({ title }) => {
    return showToast(title);
}
So, now, when an AI agent discovers this tool, it can invoke it with the required input, and the web page will handle the request accordingly.
Registering Multiple Tools or Batching (provideContext)
You can also pass a collection of context tools like so.
// Example batching multiple tools using navigator.modelContext
navigator.modelContext.provideContext({
  tools: [
    {
      name: "list_todos",
      description: "Retrieves all current to-dos for the user.",
      inputSchema: { type: "object", properties: {} },
      execute: async () => {
        const res = await fetch("/api/todos");
        return await res.json();
      }
    },
    {
      name: "toggle_todo",
      description: "Toggles a to-do item as completed or incomplete.",
      inputSchema: {
        type: "object",
        properties: {
          id: { type: "string", description: "The ID of the to-do item" }
        },
        required: ["id"]
      },
      execute: async ({ id }) => {
        const res = await fetch(`/api/todos/${id}/toggle`, { method: "POST" });
        return await res.json();
      }
    }
  ]
});
All the exposed tools can be viewed in the WebMCP tab in Chrome DevTools, and AI agents can discover and invoke them as needed.
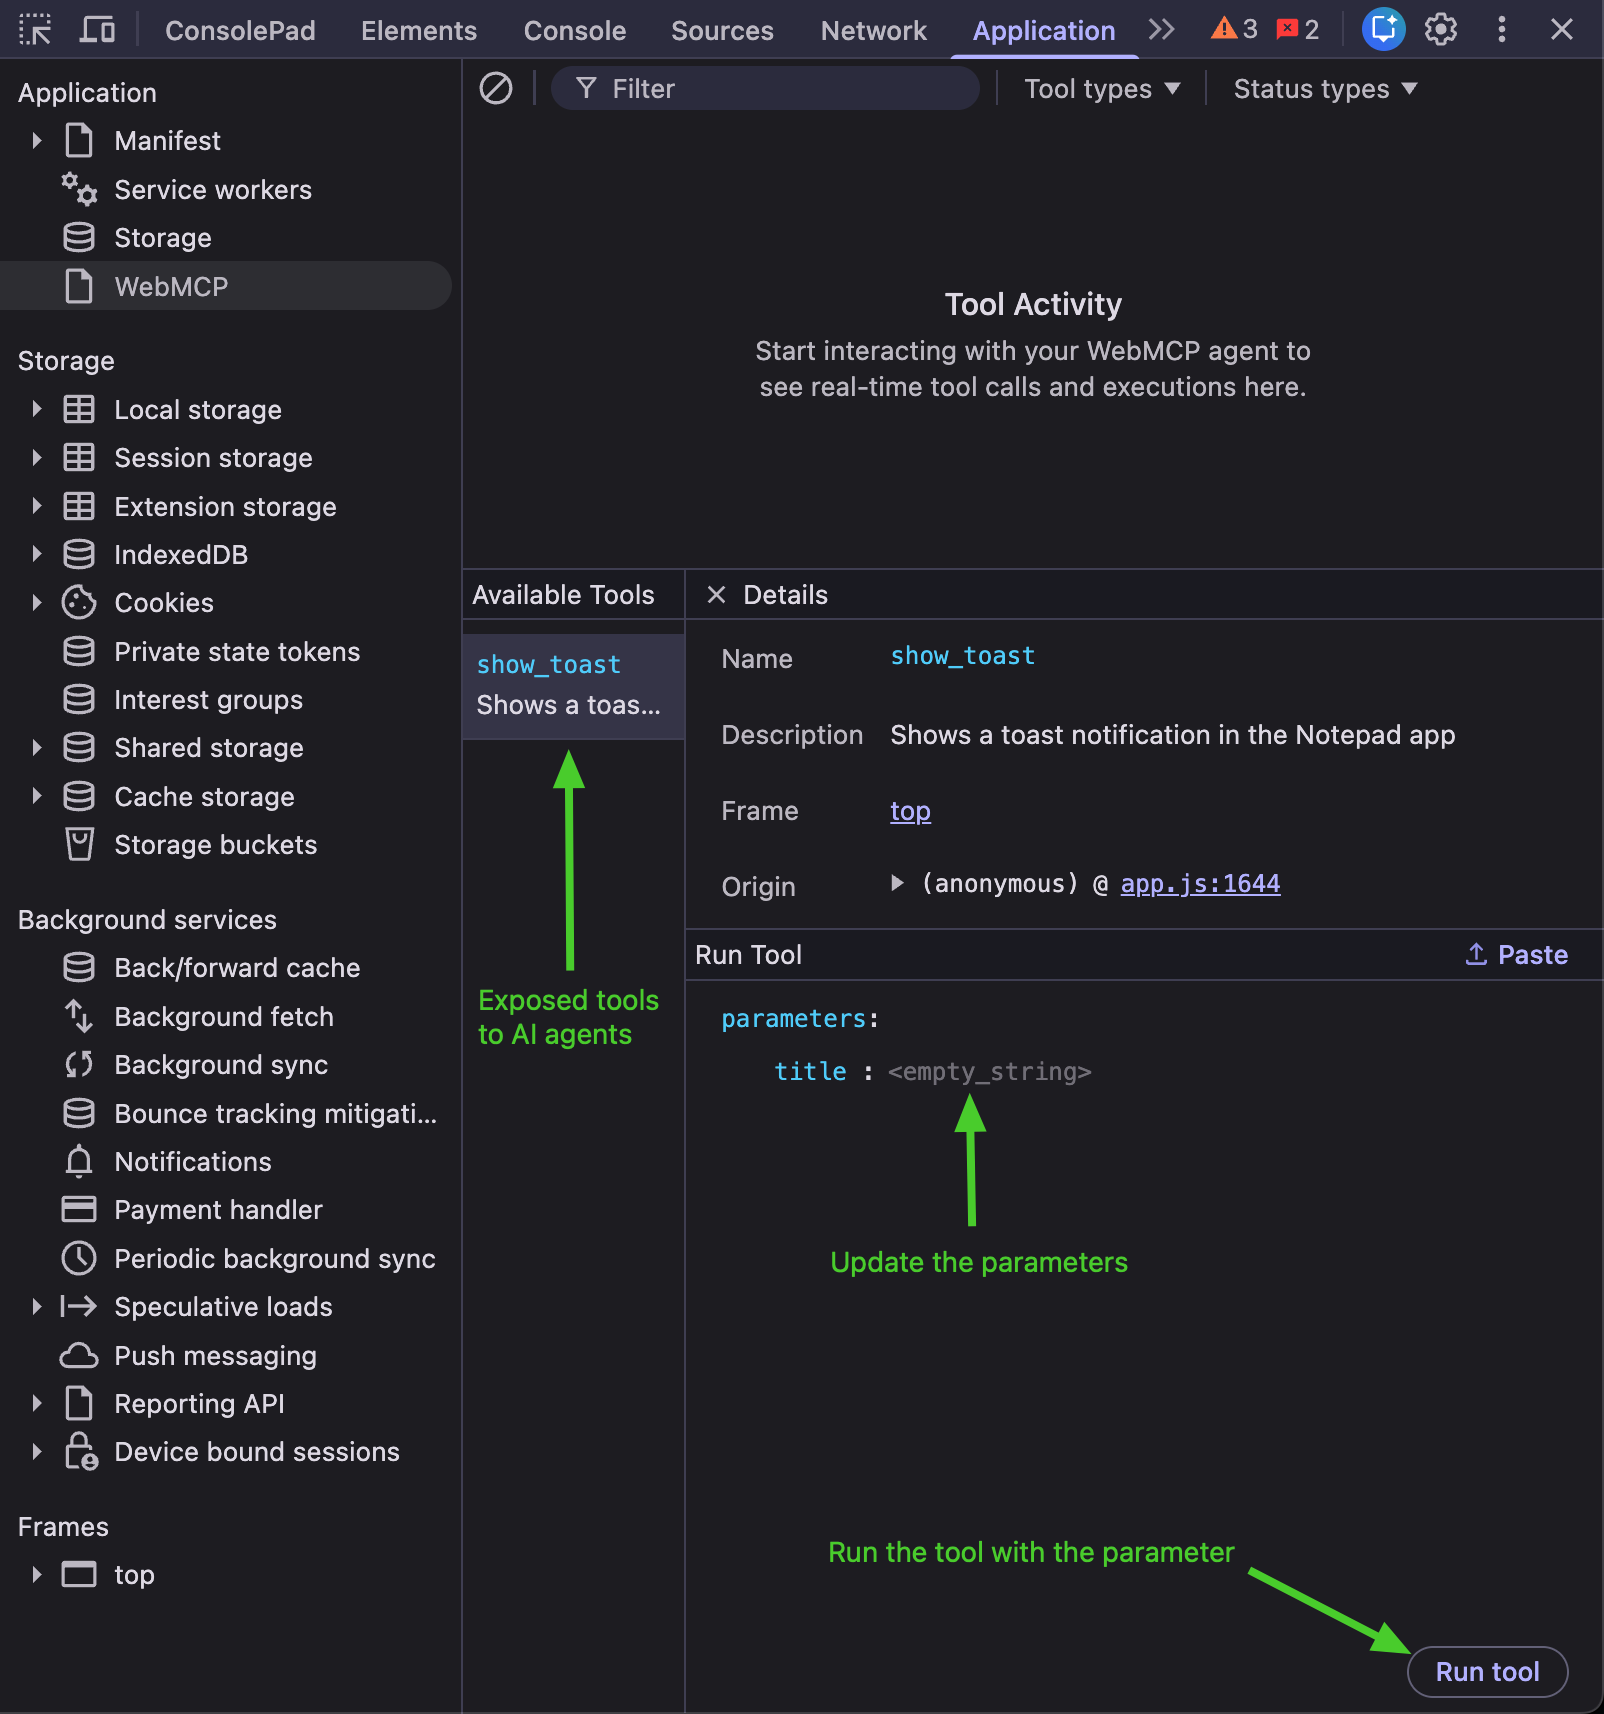
As you can tell, you can tweak the parameters of the tools and run the tool directly from the DevTools interface to see how it behaves. All the activity for these tools will be logged in the Tool Activity section of the WebMCP tab once an AI agent invokes them.
Here’s what it looks like in action.
Unregistering Tools
When a tool should no longer be available to the agent (e.g., when navigating away or changing user state), you can unregister it.
// Unregistering a specific MCP tool by name
navigator.modelContext.unregisterTool("show_toast");
In closing
WebMCP marks an important step toward an AI-native web by enabling web applications to expose their capabilities through a standardized interface instead of relying on UI automation or HTML parsing. This makes AI interactions more reliable, efficient, and resilient to interface changes.
Its potential spans a wide range of applications—from note-taking and project management tools to e-commerce, travel, banking, and content platforms. As AI assistants become a natural part of our daily workflows, WebMCP could become the standard way websites communicate with them, much like REST APIs did for traditional applications.
Further Reading

👋 Hi there! This is Amit, again. I write articles about all things web development. If you enjoy my work (the articles, the open-source projects, my general demeanour... anything really), consider leaving a tip & supporting the site. Your support is incredibly appreciated!