
A Practical Way to Check Your AI Search Visibility
Last month, I built an AI agent that could search the web before answering a question. While working on the article around that project, I got another project idea and that was around the visibility of a website in the world of AI-powered search.
The idea essentially revolves around the fact that whether the AI-powered search mentions your website in its answer or not or whether it cites your website as a source or not, and lastly, compare these resulst with the regular Google search results.
Does your website show up when AI-powered search answers questions related to the topics it covers?
When you search something on a search engine, you get a list of results. And based on that you can decide the ranking of your website. That’s not true with the AI-generated answers. Because these answers are generated based on the information available on the web and the AI model’s understanding of the topic.
So, if your website is not mentioned in the answer or cited as a source, it can be difficult to know whether your website is visible to the AI model or not.
In this tutorial, we’ll build a small AI search visibility analyzer tool in JavaScript to tackle the above challenge. The tool can accept a domain and multiple queries, call Google AI Mode and regular Google search through SearchApi, and compare the two responses.
- What we’re going to build
- Prerequisites
- The application architecture
- Calling SearchApi from the backend
- Understanding the two response shapes
- Turning AI Mode into readable answer text
- Normalizing the target domain
- Detecting AI answer mentions
- Inspecting AI references
- Comparing regular Google results
- Returning a stable application response
- Running both searches for a query
- Building the form
- Running the application
- Taking this further
- In closing
If you’ve read my previous article, you would know that the project was about giving a terminal-based application a real-time web-search capability. This project uses that same premise to inspect how AI-search results are presented to users.
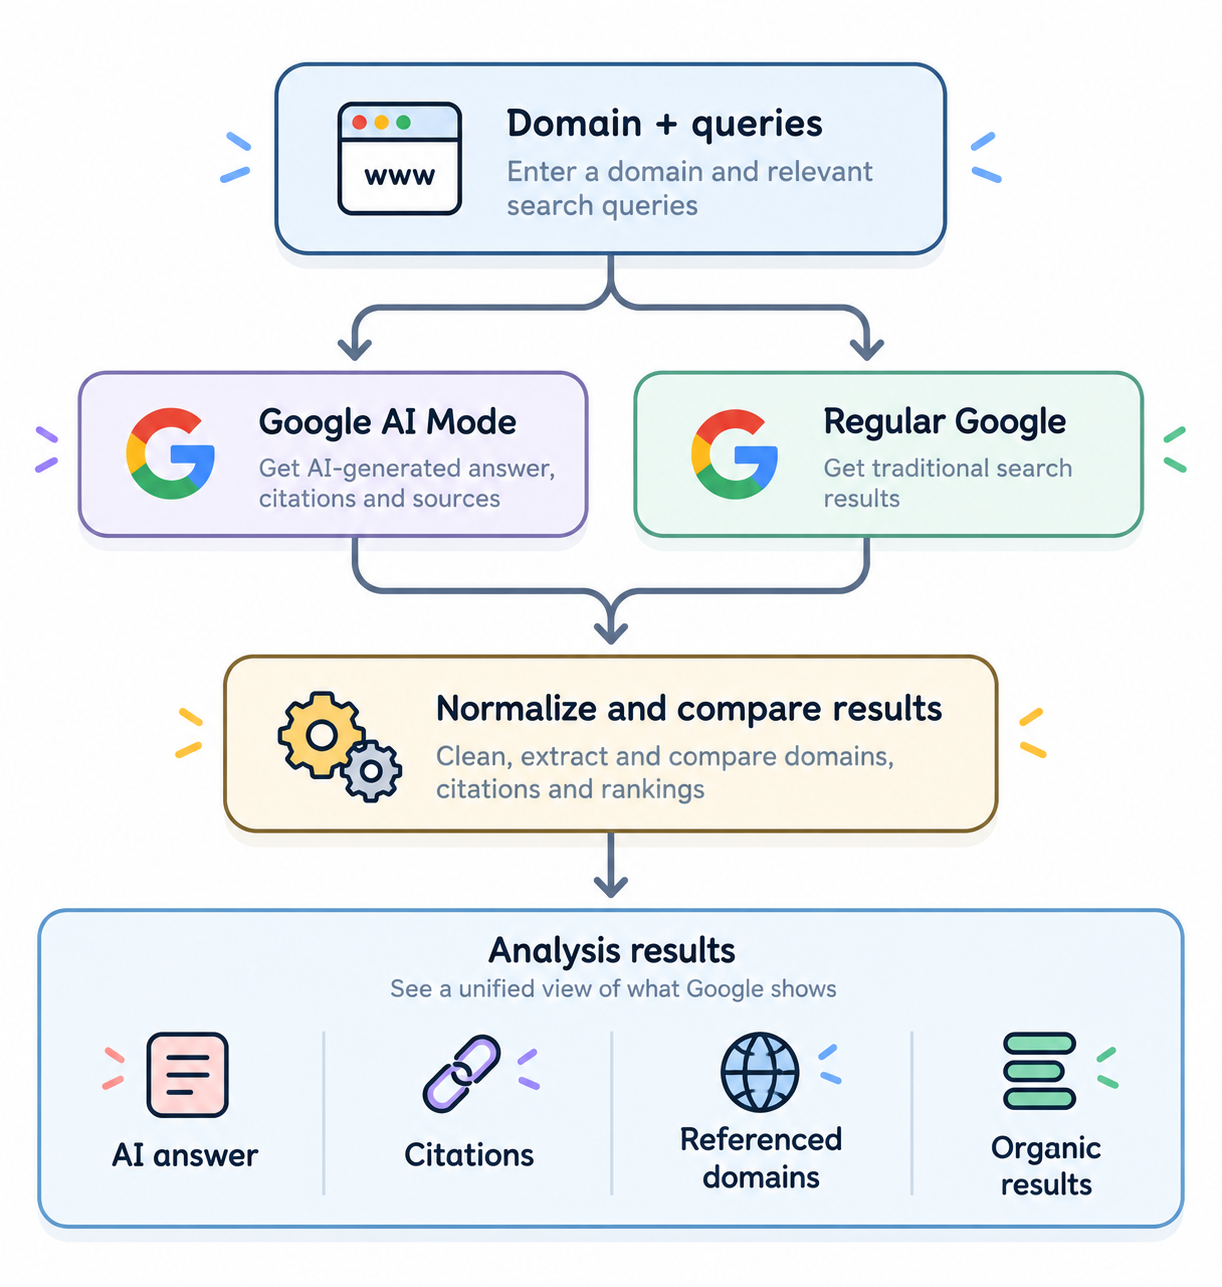
The finished application will be built around the following architecture.
What we’re going to build
Our AI search visibility analyzer has 2 inputs.
- A domain, such as
css-tricks.com. - A list of queries, one query per line.
For every query, it’ll show the following information:
- The Google AI Mode answer.
- Whether the target domain is mentioned in that answer.
- The sources cited by AI Mode.
- Other domains appearing in those citations.
- Regular Google’s organic search results.
- Whether the target domain appears in those results.
- The best organic position when Google provides one.
The tool intentionally doesn’t give a single “AI visibility score” here.
That’s because being mentioned in an answer or being cited as a source or appearing in an organic result can be related, but they are essentially not the same thing. A single number out of these would be misleading and would not make any sense.
On top of this, it’s also a one-time analyzer. It does not store runs, draw historical charts, or schedule recurring checks. These features can be enhancements for the next iteration of the project.
Prerequisites
To build the project, you will need…
- Node.js 20 or later installled on your machine.
- A SearchApi API key.
- A browser to run the frontend.
Create a project and initialize it with npm.
mkdir ai-analyzer
cd ai-analyzer
npm init -y
The project uses Node’s built-in fetch, HTTP server, test runner, and environment-file support. So, you do not need to install any additional dependencies.
Next, we’ll create a .env file at the project root and add our SearchApi API key.
SEARCHAPI_API_KEY="your_searchapi_api_key"
This API key will stay on the server. We’re not placing it in client-side JavaScript or sending it back in an API response. That could be a security hazard.
The application architecture
The application has a small Node.js backend and a static frontend and the entire package could be summarized like so.
Browser
  → POST /api/analyze
      → validate domain and queries
      → call Google AI Mode
      → call regular Google
      → normalize provider responses
      → compare domains and aggregate signals
Server
  ← return a stable application response
We’re keeping the SearchApi-specific details out of the UI.
SearchApi returns different data for AI Mode and regular Google search results. And so, in the backend, we’re turning those responses into a simple format that the frontend can understand.
So, the project is split into the following few small pieces/modules:
server.mjs- The entry point of the application. It handles the HTTP server and routes.src/searchapi.mjs- Handles the SearchApi calls for both Google AI Mode and regular Google search.src/analysis.mjs- Handles the analysis logic to compare the AI Mode and regular Google search results.public/- Contains the static frontend files.test/- Contains the test files for the backend modules.
Calling SearchApi from the backend
The SearchApi request pattern is the same one I used in the previous article, which is to construct a URL, add the engine and query, and send the API key as a bearer token.
Here, we’ll be using two SearchApi engines to fulfill our requirements.
google_ai_modegoogle
We kept the SearchApi calls in their own module so the rest of the application doesn’t have to worry about how the requests are made.
Here’s what the module looks like.
const endpoint = "https://www.searchapi.io/api/v1/search";

export async function searchApi({
  engine,
  query,
  apiKey,
  fetchImpl = fetch,
  timeoutMs = 30_000,
}) {
  if (!apiKey) {
    throw new Error("SEARCHAPI_API_KEY is not configured.");
  }

  const url = new URL(endpoint);
  url.searchParams.set("engine", engine);
  url.searchParams.set("q", query);

  const controller = new AbortController();
  const timer = setTimeout(() => controller.abort(), timeoutMs);

  try {
    const response = await fetchImpl(url, {
      headers: {
        Authorization: `Bearer ${apiKey}`,
        Accept: "application/json",
      },
      signal: controller.signal,
    });

    if (!response.ok) {
      throw new Error(`SearchApi returned ${response.status}.`);
    }

    return await response.json();
  } finally {
    clearTimeout(timer);
  }
}

export const searchAiMode = (options) =>
  searchApi({ ...options, engine: "google_ai_mode" });

export const searchGoogle = (options) =>
  searchApi({ ...options, engine: "google" });
As you can tell, we’re using URL and searchParams to construct the request rather than concatenating the query into the URL ourselves. This takes care of encoding things like spaces and punctuation.
Since we’re dealing with an external API, we also added a timeout to the request. If the request takes longer than 30 seconds, it will be aborted and an error will be thrown.
Understanding the two response shapes
The Google AI Mode and the regular Google Search returns different response structures. So, we need to handle them a little differently.
For instance, the following fields can be returned in the AI mode response:
text_blocks- An array of text blocks that make up the answer. Each block can be a string or an object with ananswerfield and an optionalitemsarray.markdown- A string containing the answer in Markdown format.reference_links- An array of links to the sources cited by the answer.web_results- An array of additional web results.
On the other hand, the regular Google Search returns organic_results for the usual search listings.
I didn’t want the application to deal with all these different fields itself and so, I created a normalization function for both the response types to extract the relevant information and return back it in one consistent format.
function normalizeWebResults(response) {
  const results =
    response?.organic_results ??
    response?.web_results ??
    [];

  return (Array.isArray(results) ? results : [])
    .map(normalizeLink)
    .filter((item) => item.link || item.title || item.snippet);
}
Here, we’re falling back to web_results because AI Mode can also return web results. We’re not treating the two response formats as identical. We’re just extracting the parts that the analyzer needs into a common format.
Also, these fields are optional. That is because a query might not return any references or organic results, and that’s quite different from the request failing itself. So, we need to handle the case where these fields are missing and return an empty array instead of throwing an error.
Turning AI Mode into readable answer text
We’re using SearchApi’s text_blocks instead of the markdown field because the markdown field can contain citation links and reference markers that don’t look great when simply printed on the page.
For the first version, I decided to extract the actual text from text_blocks instead like so.
function answerText(response) {
  const blocks = Array.isArray(response?.text_blocks)
    ? response.text_blocks
    : [];

  const text = blocks
    .map((block) => {
      if (typeof block === "string") {
        return block;
      }

      const parts = [
        block?.answer,
        ...(Array.isArray(block?.items)
          ? block.items.map((item) => item?.answer)
          : []),
      ];

      return parts.filter(Boolean).join("\n");
    })
    .filter(Boolean)
    .join("\n\n");

  return text || response?.markdown || "";
}
As you can tell, we’re iterating through the text_blocks array and extracting the answer field from each block. If a block has an items array, we’re also extracting the answer field from each item in that array.
Lastly, we’re joining all the extracted answers with two newlines to create a readable answer text. If for some reason, there are no text_blocks, we’re falling back to the markdown field.
Normalizing the target domain
Before comparing the results, we need to make sure the domain entered by the user is in a consistent format. For instance, the following URLs should point to the same target.
css-tricks.com
https://css-tricks.com
https://www.css-tricks.com/some-page
So instead of comparing the full URLs, we’re extracting the hostname and using that for the comparison.
export function normalizeDomain(value) {
  const input = String(value ?? "").trim();

  if (!input) {
    throw new Error("Enter a domain.");
  }

  const candidate = /^https?:\/\//i.test(input)
    ? input
    : `https://${input}`;

  let hostname;

  try {
    hostname = new URL(candidate)
      .hostname
      .toLowerCase()
      .replace(/^www\./, "");
  } catch {
    throw new Error("Enter a valid domain, such as example.com.");
  }

  if (
    !hostname ||
    hostname.includes(" ") ||
    !hostname.includes(".") ||
    hostname.startsWith(".") ||
    hostname.endsWith(".")
  ) {
    throw new Error("Enter a valid domain, such as example.com.");
  }

  return hostname;
}
As you can see, we’re also not treating every subdomain as the same domain. blog.example.com and example.com might be two different properties, and so we want to keep them separate. The only exception is the www subdomain, which is treated as the same as the root domain.
Detecting AI answer mentions
When you work with AI-generated answers, there are two possibilities. Either the answer mentions a website as a useful resource or it cites a website as one of its sources.
Here, we’re using a simple string check to if the answer mentions the target domain or not.
const answer = answerText(aiResponse);

const mentionedDomain = answer
  .toLowerCase()
  .includes(targetDomain);
As you can tell, we’re converting both the answer and the target domain to lowercase before checking for a mention. This makes the check case-insensitive.
Inspecting AI references
Next, we’re normalizing the AI Mode references so that we can work with them in the same way throughout the application using a normalizeLink function.
function normalizeLink(item) {
  const link = typeof item?.link === "string"
    ? item.link
    : undefined;

  return {
    title: item?.title || undefined,
    link,
    hostname: hostnameFromUrl(link),
    source: item?.source || undefined,
    snippet: item?.snippet || undefined,
    displayedLink: item?.displayed_link || undefined,
    position: Number.isFinite(item?.position)
      ? item.position
      : undefined,
    index: Number.isFinite(item?.index)
      ? item.index
      : undefined,
  };
}
Here, we’re extracting the hostname from the link so that we can compare it with the target domain. We’re also normalizing other fields like title, source, and snippet to make sure they are either strings or undefined.
Once the references are in this format, checking whether the target domain was cited is quite straightforward. We just check if any of the normalized references have a hostname that matches the target domain like so.
const citedTarget = references.some(
  (reference) => reference.hostname === targetDomain
);
One thing I noticed while working with the references is that some Google links can be redirects rather than direct links to the original page. So, when SearchApi can’t resolve one of those links, we keep the URL as it is instead of trying to guess where it points.
Comparing regular Google results
The regular Google search gives us the traditional organic results, so we can use those to check whether the target domain appears there and if so, what its best position is.
const results = normalizeWebResults(googleResponse);

const matchingResults = results.filter(
  (result) => result.hostname === targetDomain
);

const bestPosition = matchingResults
  .map((result) => result.position)
  .filter(Number.isFinite)
  .sort((a, b) => a - b)[0];
If Google gives us a position result, we’re showing it in the UI. If in case it doesn’t, we just report that the domain was found in the results.
At this point, we have three visibility pointers for the target domain.
- Mentioned in answer
- Cited in AI references
- Found in organic results
Keeping these pointers separate is important. For instance, a domain can appear in the organic results without being mentioned in the AI answer. It can also be cited by AI Mode without appearing near the top of the organic results. And sometimes, it can be mentioned in the answer without being one of the cited sources.
And so, we want to keep these three pointers separate in the analyzer rather than combining them into a single score as said earlier.
Returning a stable application response
The application doesn’t send the raw SearchApi responses back to the browser as it is. We’re building and returning a smaller response from the backend so frontend only receives the information it needs to display the results.
For a single query, the response looks something like so.
{
  query: "best CSS blog",
  status: "success",
  aiMode: {
    answerText: "...",
    mentionedDomain: false,
    references: [],
    otherDomains: ["example.com"]
  },
  google: {
    results: [],
    foundDomain: false,
    otherDomains: []
  }
}
We also return a summary for the whole run.
{
  targetDomain: "css-tricks.com",
  analyzedAt: "2026-09-23T10:00:00.000Z",
  summary: {
    totalQueries: 3,
    successfulQueries: 3,
    failedQueries: 0,
    answerMentionCount: 1,
    aiReferenceCount: 1,
    regularResultCount: 2,
    referencedDomains: ["smashingmagazine.com"]
  },
  queries: []
}
We’re creating this succinct response structure so the frontend doesn’t need to know anything about the underlying API responses and the results stay consistent.
Running both searches for a query
For each query, we need to make two SearchApi requests: one to Google AI Mode and one to regular Google search. Since they’re independent of each other, we can run them in parallel like so.
const [ai, google] = await Promise.allSettled([
  searchAiMode({
    query,
    apiKey: process.env.SEARCHAPI_API_KEY,
  }),
  searchGoogle({
    query,
    apiKey: process.env.SEARCHAPI_API_KEY,
  }),
]);
As you can tell, we’re using Promise.allSettled() here instead of Promise.all() because we don’t want one failed request to hamper the other result. If AI Mode succeeds but regular Google search fails, we can still show the AI Mode result and mark the query as partial. And vice versa.
If both requests fail, we mark the query as an error.
We’re also limiting each run to ten queries. Since each query makes two SearchApi requests, that gives us a predictable maximum of 20 requests per run, keeping the interface reasonably fast.
Building the form
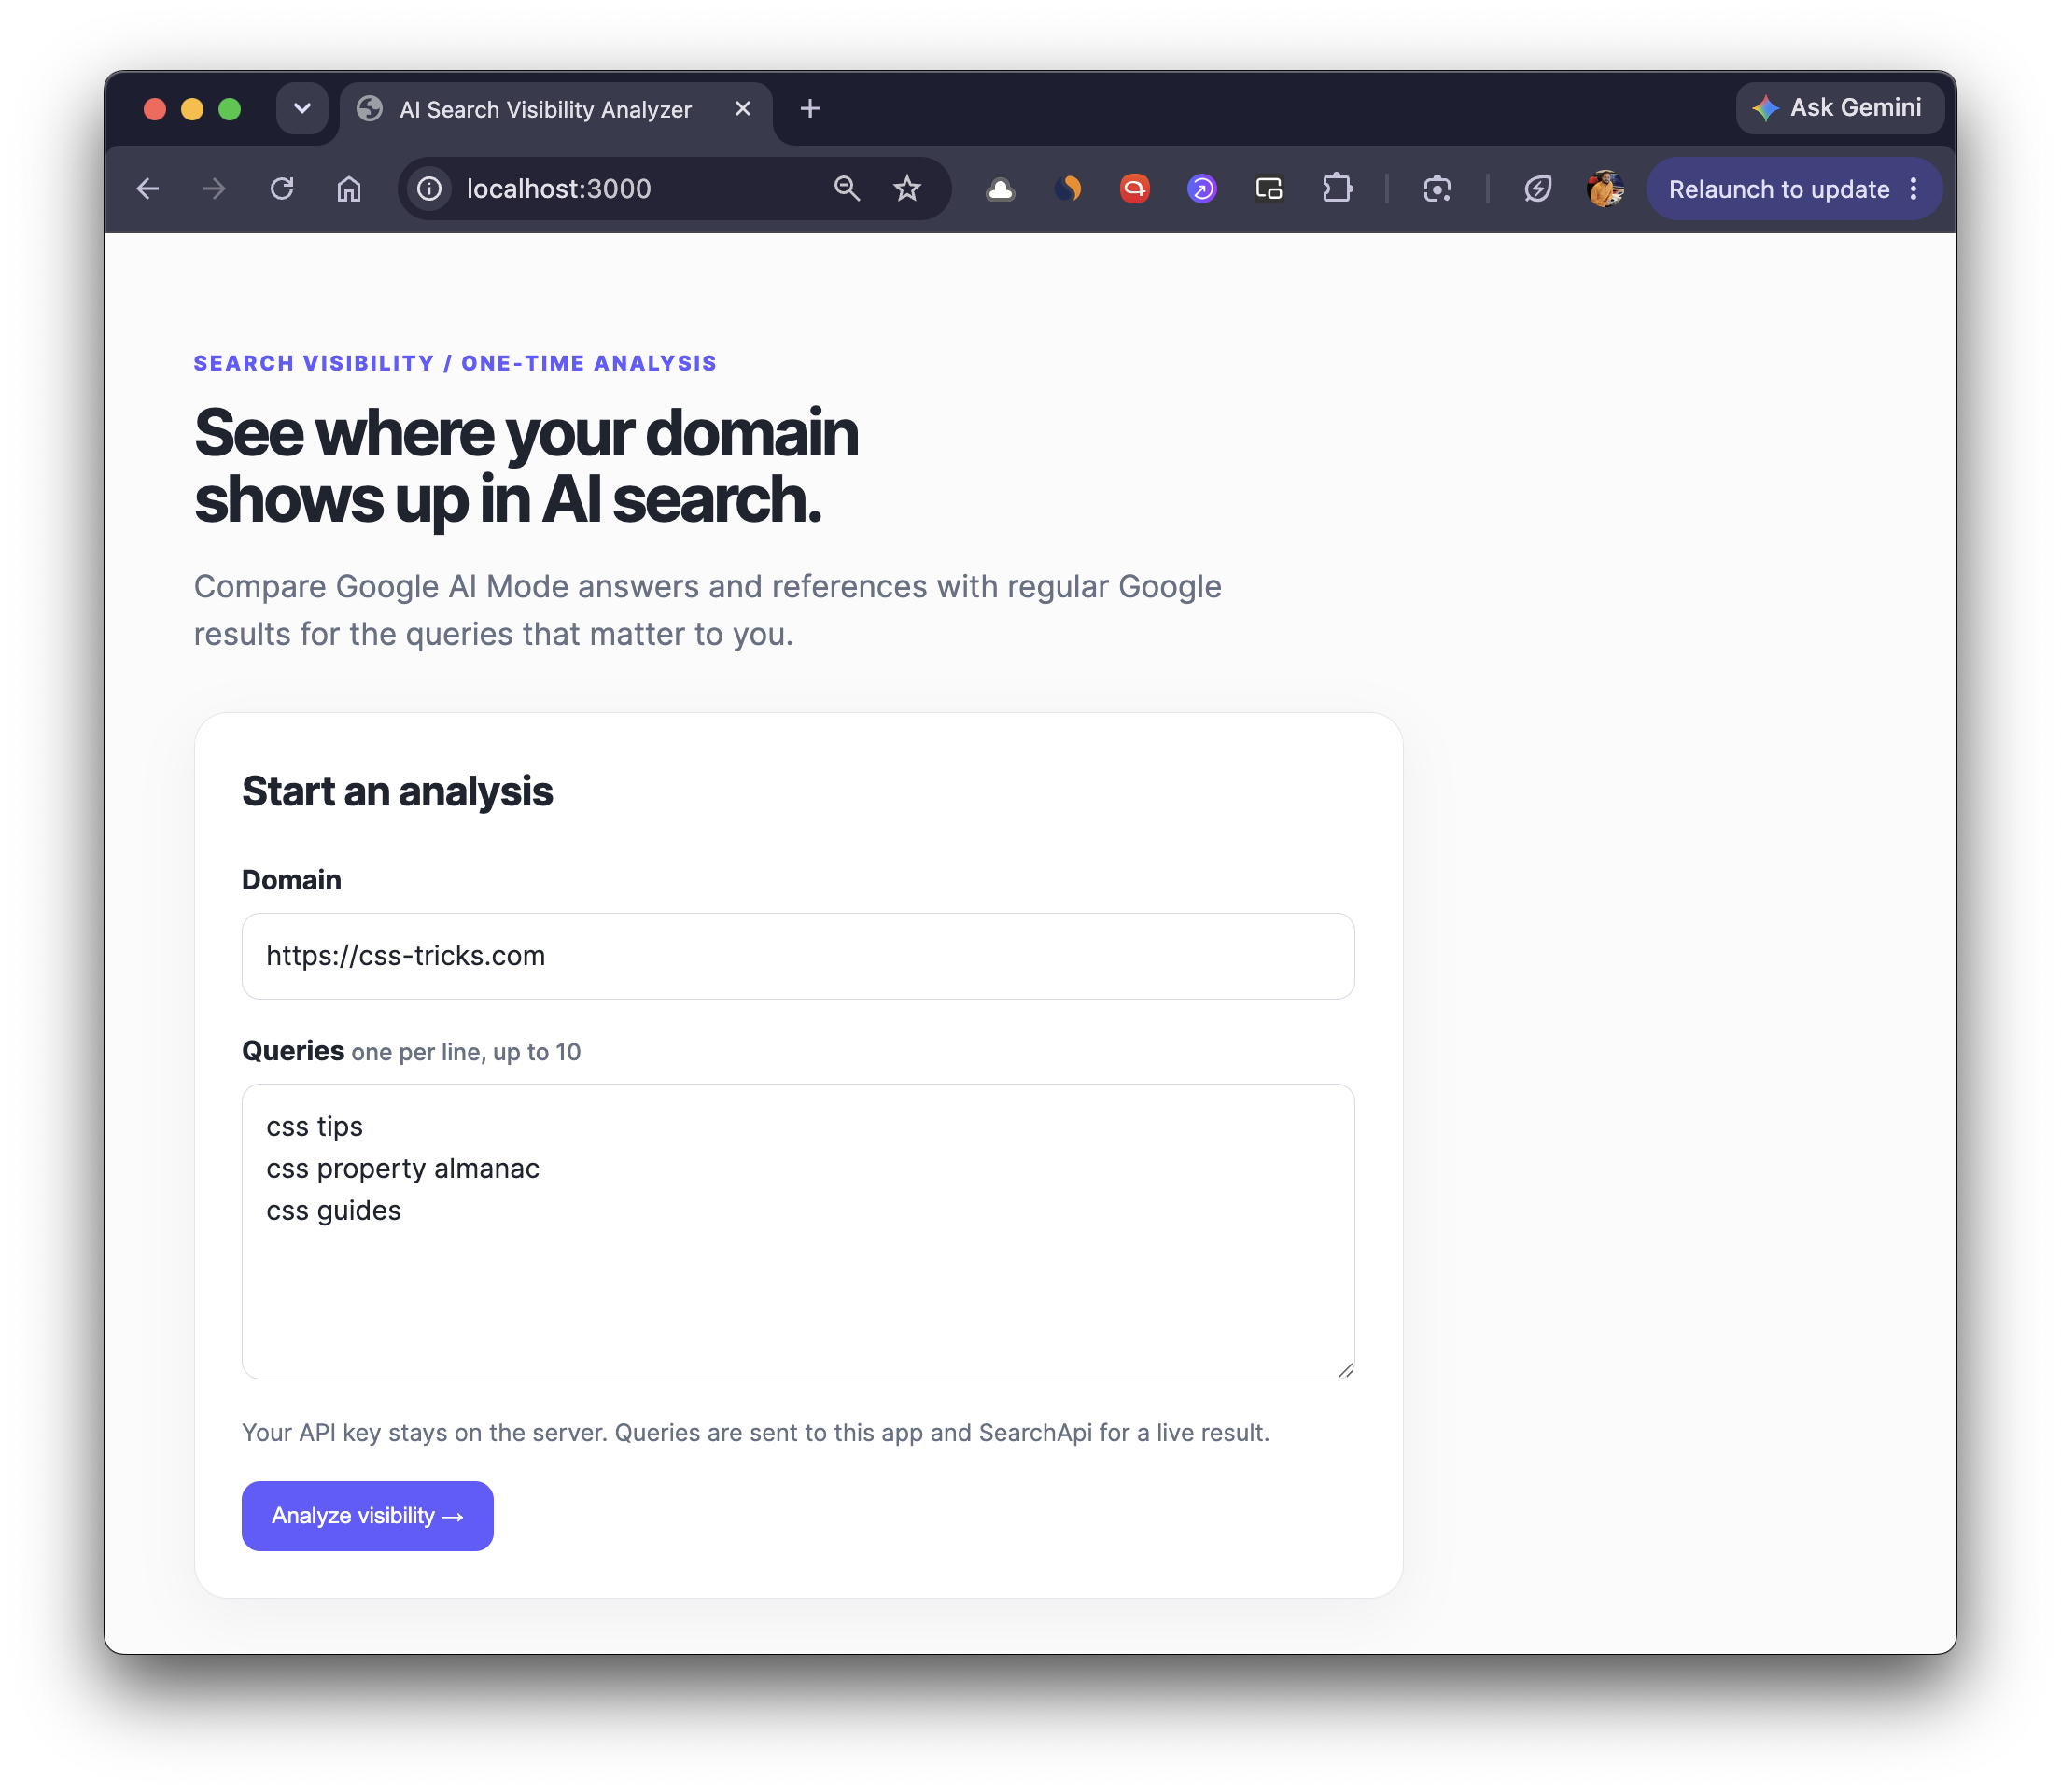
The frontend for this application is intentionally simple. It only needs a domain, a list of queries, and a button to start the analysis. And That’s it.
<form id="analyze-form">
  <label for="domain">Domain</label>
  <input
    id="domain"
    name="domain"
    type="text"
    placeholder="example.com"
    required
  />

  <label for="queries">Queries</label>
  <textarea
    id="queries"
    name="queries"
    rows="6"
    placeholder="best CSS blog
best UI blog"
    required
  ></textarea>

  <button type="submit">Analyze visibility</button>
</form>
When the form is submitted, the browser sends the input to the backend like so.
const response = await fetch("/api/analyze", {
  method: "POST",
  headers: {
    "content-type": "application/json",
  },
  body: JSON.stringify({
    domain: form.domain.value,
    queries: form.queries.value,
  }),
});
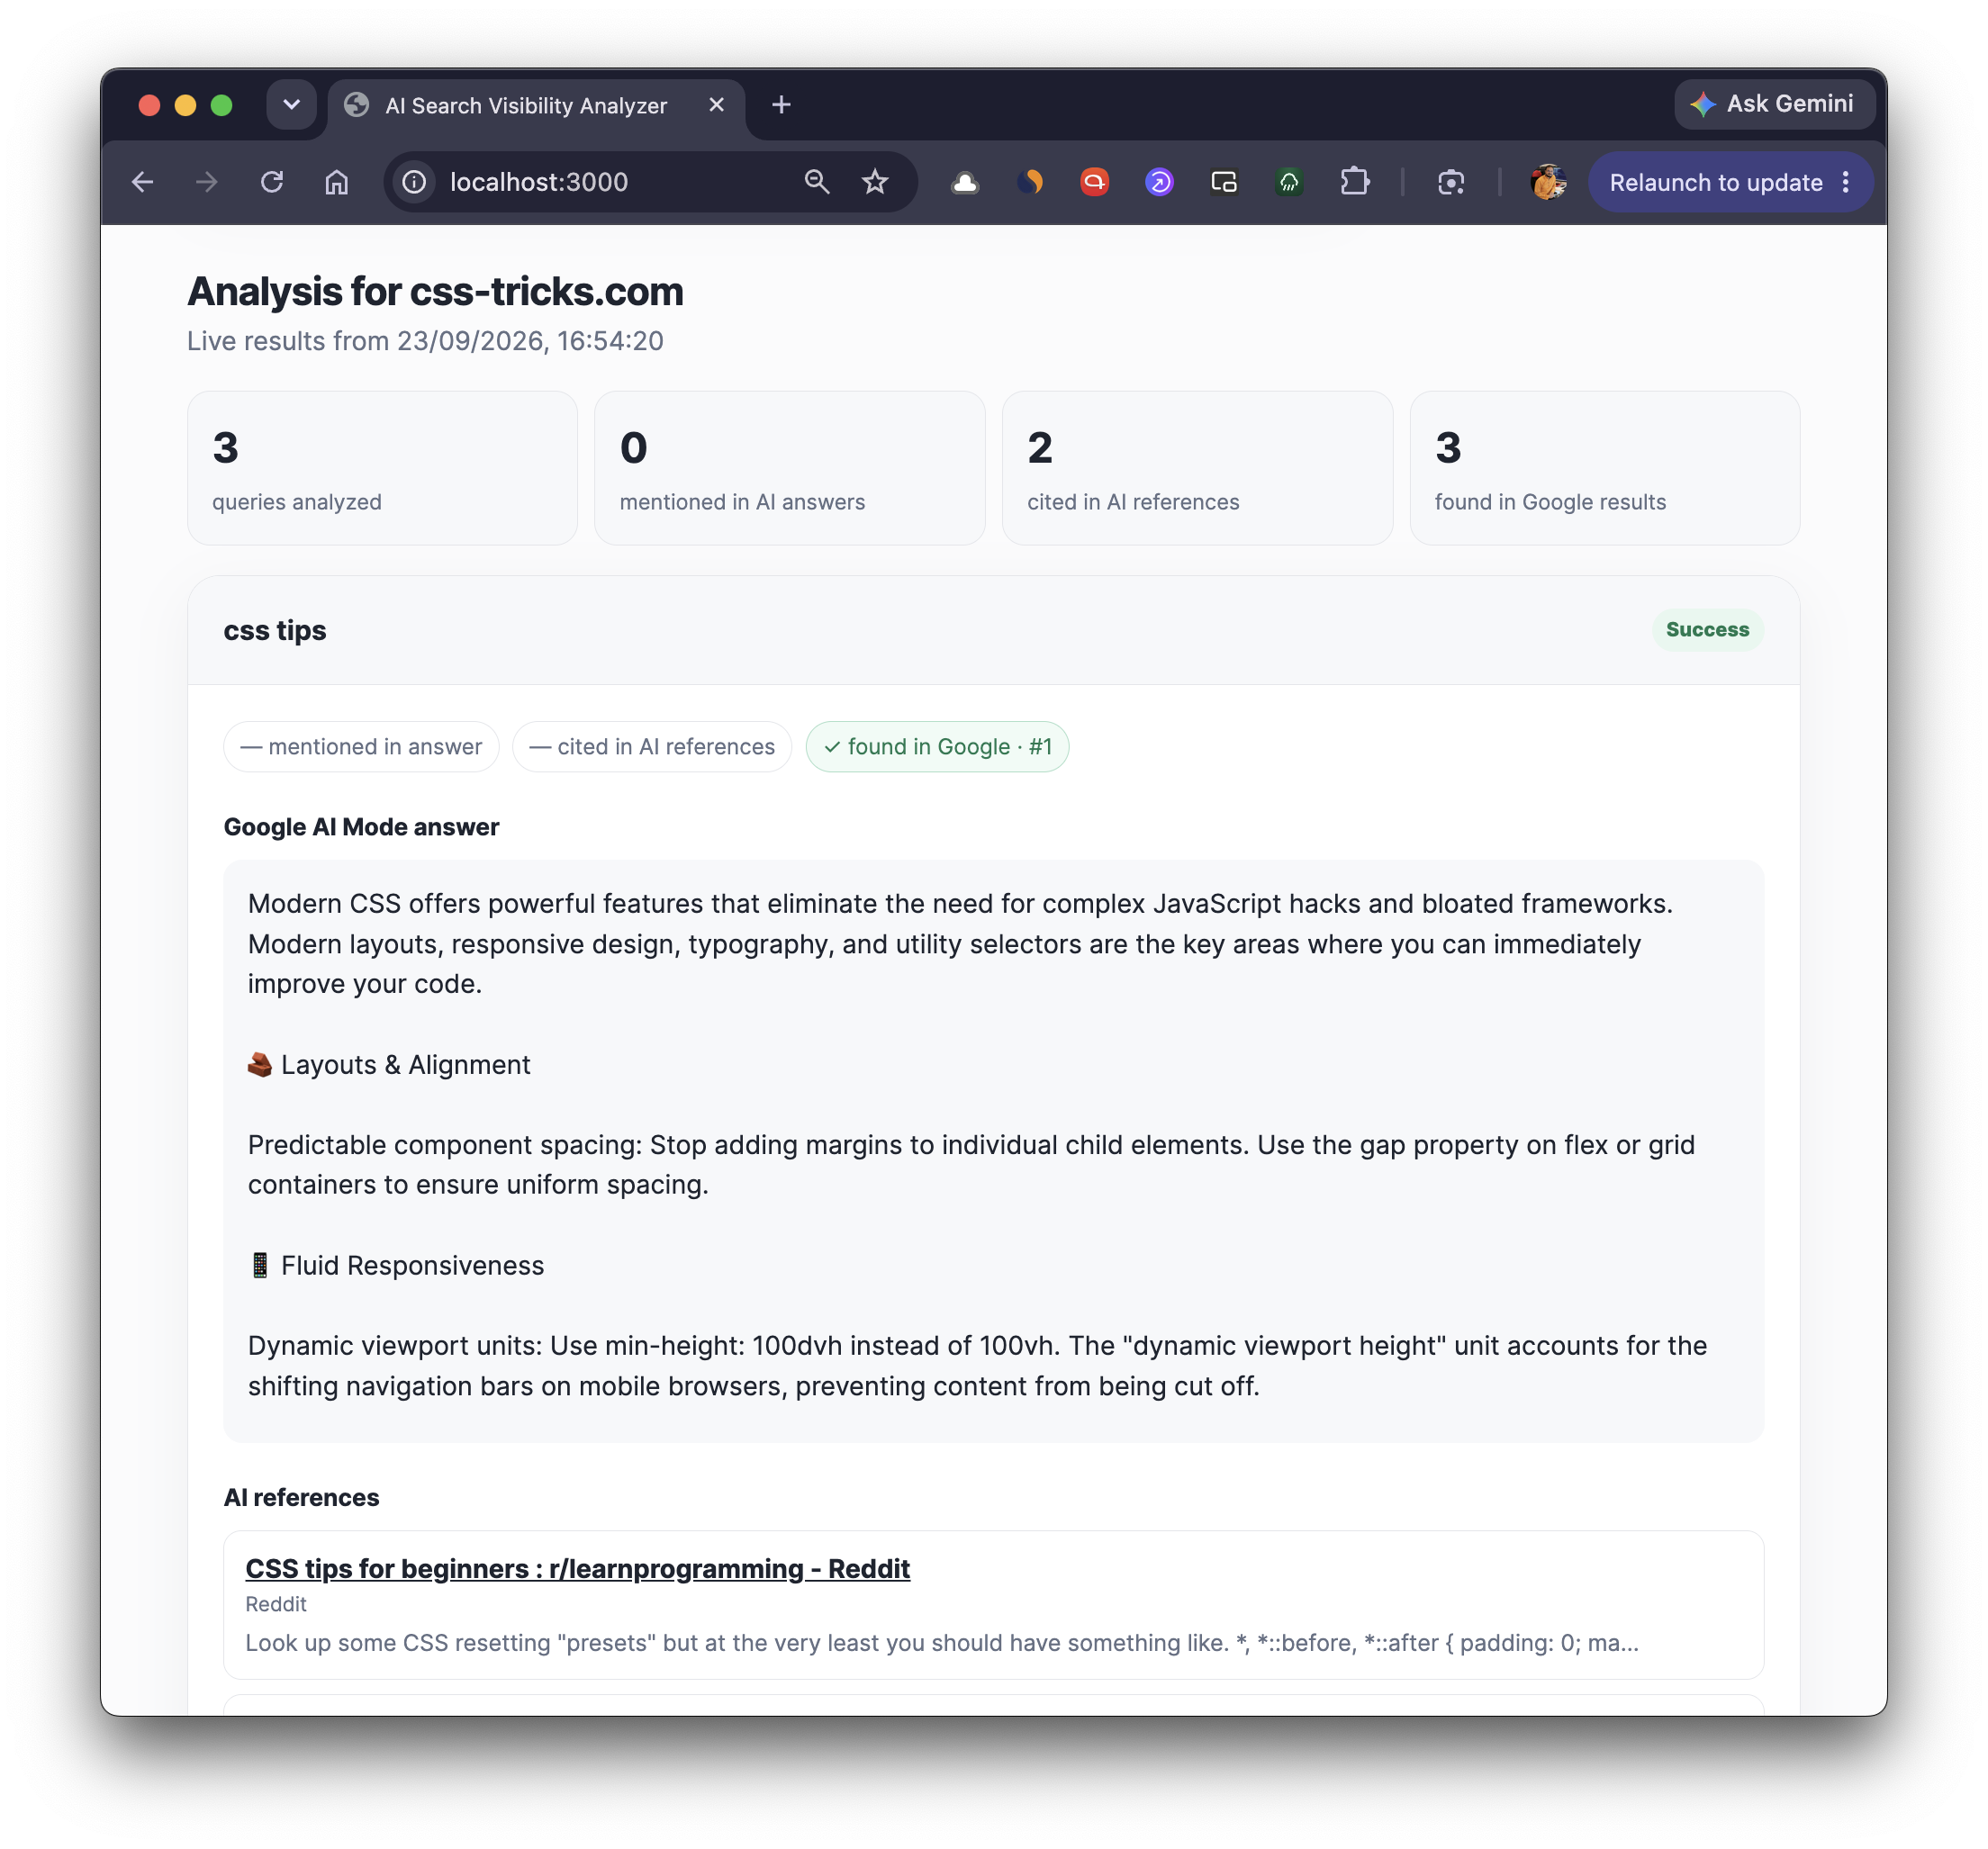
Once the response comes back, the UI shows a summary followed by a result card for each query. Each card contains the AI answer, its references, the organic results, and the three visibility signals we’ve been tracking.
For the first version, I kept everything visible without introducing a complicated dashboard. If I were to turn this into a larger product, I’d probably collapse long answers and source lists behind expandable sections. You get the idea.
Running the application
Start the app:
npm start
Then open http://localhost:3000 and enter a domain along with a few queries.
For example…
Domain: css-tricks.com

Queries:
best css blog
css property almanac
css guides
Once the analysis finishes, you’ll get the AI Mode answer, its references, the regular Google search results, and the three visibility signals for each query.
One thing to keep in mind is that these are live search results. The exact wording of a query, location, language, timing, and other search conditions can affect what comes back. So, this tool is best thought of as a snapshot of what the search surfaces returned at that time, rather than a permanent ranking report.
Here’s what the input screen looks like.
And here’s the results screen.
If you want to try it yourself, the complete source is available on GitHub. Fork it, add your SearchApi API key in the
.envfile, and you’re ready to go.
Taking this further
We intentionally kept the first version of this little tool small, but there’s definitely room for growth. We could store runs and track changes over time, add scheduled checks and alerts, or compare multiple domains. It could also be extended to support other search engines and AI-powered search tools.
Things like DB persistence, timestamps, query versioning, etc. are a few good candidates for a future article to cover, but for now, I think this is a good starting point to understand how your website is visible in the world of AI-powered search with as little as possible.
In closing
We built this POC to explore what does a website’s visibility look like when search starts generating answers instead of just showing links.
Our little tool gives us a way to look at that question without reducing everything to a single score. For each query, we can see whether a domain was mentioned in the AI answer, cited as a source, or appeared in the regular search results.
And even though it’s a small tool, it makes the difference between traditional search and AI-powered search much easier to see and understand while still being useful.

👋 Hi there! This is Amit, again. I write articles about all things web development. If you enjoy my work (the articles, the open-source projects, my general demeanour... anything really), consider leaving a tip & supporting the site. Your support is incredibly appreciated!